Welcome to Zeadwood
The world outside the walls is no longer safe.
Abandoned homes, empty streets, overgrown trails, forgotten farms, and stretches of wilderness surround the last places where survivors have managed to establish some measure of security.
Beyond those safe areas are the Zeds.
Zeadwood is a multiplayer text-based survival game built around exploration, combat, scavenging, cooperation, character advancement, and discovery.
You control your survivor by entering commands or by using the browser interface. You can explore the world, gather equipment and resources, develop abilities, fight Zeds, help other survivors, and contribute to the Safe Zone.
You are not expected to understand everything immediately.
Learn the Safe Zone.
Get comfortable with movement.
Train a few useful abilities.
Then decide when you are ready to step outside the gate.
Creating Your Survivor
The first time you connect to Zeadwood, create your survivor from the login screen with:
create <charactername> <password> <email@email.com>Example:
create Pike mypassword pike@example.comAfter your survivor is created, Zeadwood will guide you through a short appearance setup. Answer the questions when prompted, then review the generated description of your survivor.
When Zeadwood asks whether you want to accept the appearance:
Yaccepts the description, while:
Nlets you create a different appearance.
Once the appearance is accepted, your survivor enters the world and is ready to play.
Quick Start
1. Understanding the Interface
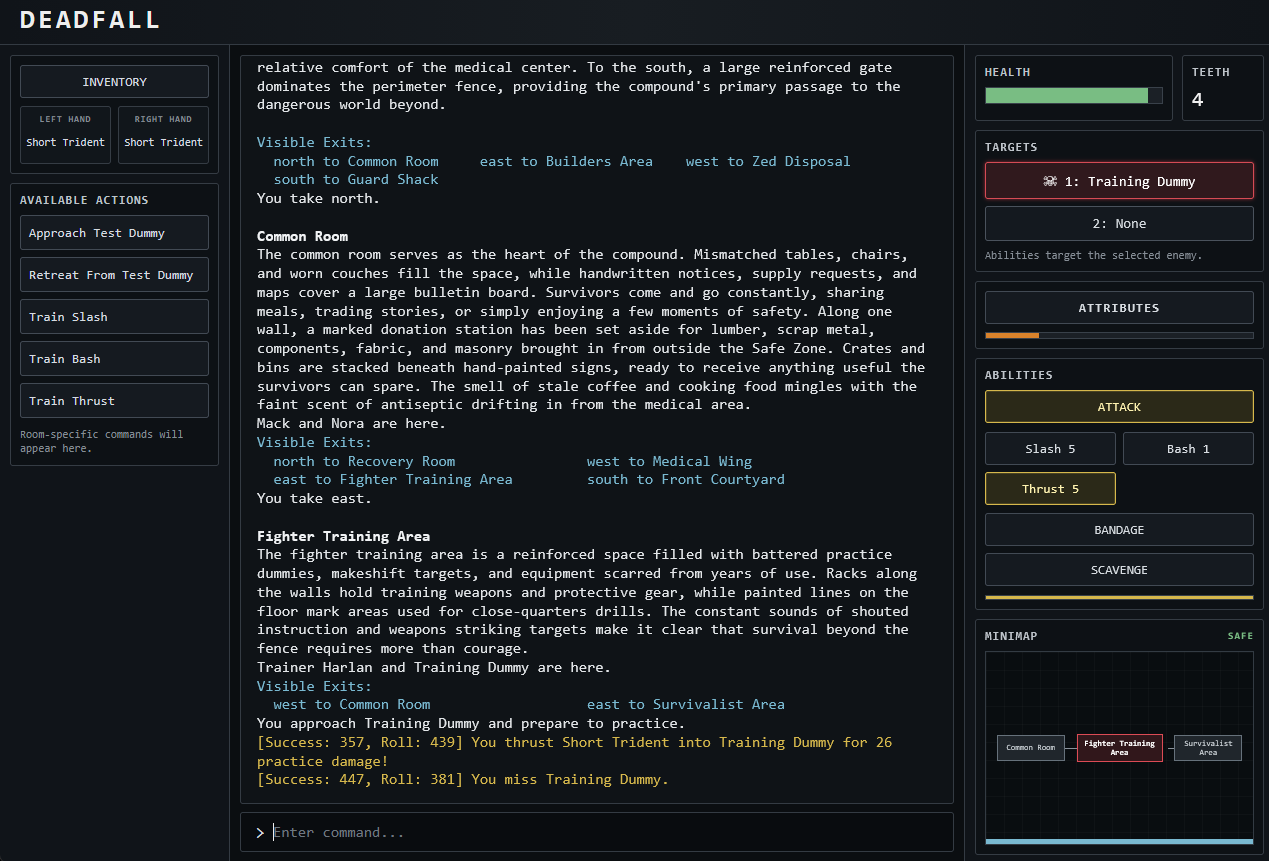
Left Side — Inventory, Equipment & Available Actions
Inventory
The INVENTORY button displays your current inventory in the game transcript.
invEquipped Hands
Directly beneath INVENTORY are two equipment cells:
- LEFT HAND
- RIGHT HAND
These show what your survivor currently has equipped. They update automatically when items are wielded or unwielded and are populated when you log in.
Available Actions
The Available Actions panel contains buttons related to your current location. These buttons change automatically as you move through the world.
Safe Zone examples include:
- Receive Treatment
- Resupply
- Train Bandage
- Dispose Corpse
- Approach Test Dummy
- Retreat From Test Dummy
- Donations
- Donate
- Deposit
These buttons are conveniences. Almost every action they represent can also be performed by typing its normal Zeadwood command.
Center — Game Transcript
The large center window is the heart of Zeadwood. Everything happening around your survivor appears here, including room descriptions, visible exits, combat, Zed activity, player movement, NPC activity, speech, loot, healing, searching, scavenging, environmental messages, and command results.
Command Bar
look north attack zed bandage mePreviously entered commands can be recalled using the Up and Down Arrow keys.
Automatic Command Bar Focus
After you click most interface controls, Zeadwood automatically returns keyboard focus to the command bar. You can click an ability, target, room action, corpse action, minimap location, or other button and immediately begin typing another command.
Right Side — Survivor Information
Health
The green Health bar represents your current health compared with your maximum health. If your health reaches zero, you become incapacitated and are eventually returned to the Recovery Room.
Teeth
Teeth are collected from dead Zeds and are used to purchase training in various abilities.
teethTargets
Zeadwood can display up to two enemies currently engaged with you. Selecting a target tells the interface which enemy should receive your next combat ability.
The target buttons track the exact Zed that engaged you, even when several Zeds have identical names. Training Dummy targeting is handled separately.
Attributes and Advancement Progress
attributesCombat Abilities
The large ATTACK button is always highlighted because the standard attack can always be used, even without a weapon.
Learned abilities such as Slash, Bash, and Thrust appear beneath it with their ranks. These buttons highlight only when the weapon in your right hand supports that attack type.
- Slash requires a slashing weapon.
- Bash requires a blunt weapon.
- Thrust requires a piercing weapon.
Some weapons support more than one attack type.
Bandage
bandage meScavenge
The SCAVENGE button performs the Scavenge action and becomes unavailable during its cooldown.
Action Cooldown
A thin gold bar represents your general action or combat cooldown.
Minimap & Threat Display
The minimap shows your current location and directly connected rooms. Neighboring rooms can be clicked to move.
It also shows the threat category of the room you currently occupy:
- SAFE — green
- NORMAL — neutral
- MODERATE — orange
- HIGH — red
The current-room marker changes its border and glow to match the threat level. Threat information is presented in the minimap rather than as raw technical messages in the transcript.
2–4. Looking, Moving & Listening to the World
Looking Around
look look corpse look zed look flashlight look pike look northZeadwood rewards players who pay attention to descriptions.
Moving Through the World
n s e wVisible Exits: north to Recovery Room east to Fighter Training Area south to Front CourtyardMovement Cooldown
Normal survivors have a short movement cooldown of approximately three seconds.
You need a moment before moving again.Listening to the World
You hear something moving off to the south.This means something moved through a nearby area. It does not tell you what moved.
Ambient Messages
Some locations occasionally produce atmospheric messages after you have remained there for a short time.
Probably.
5. The Safe Zone
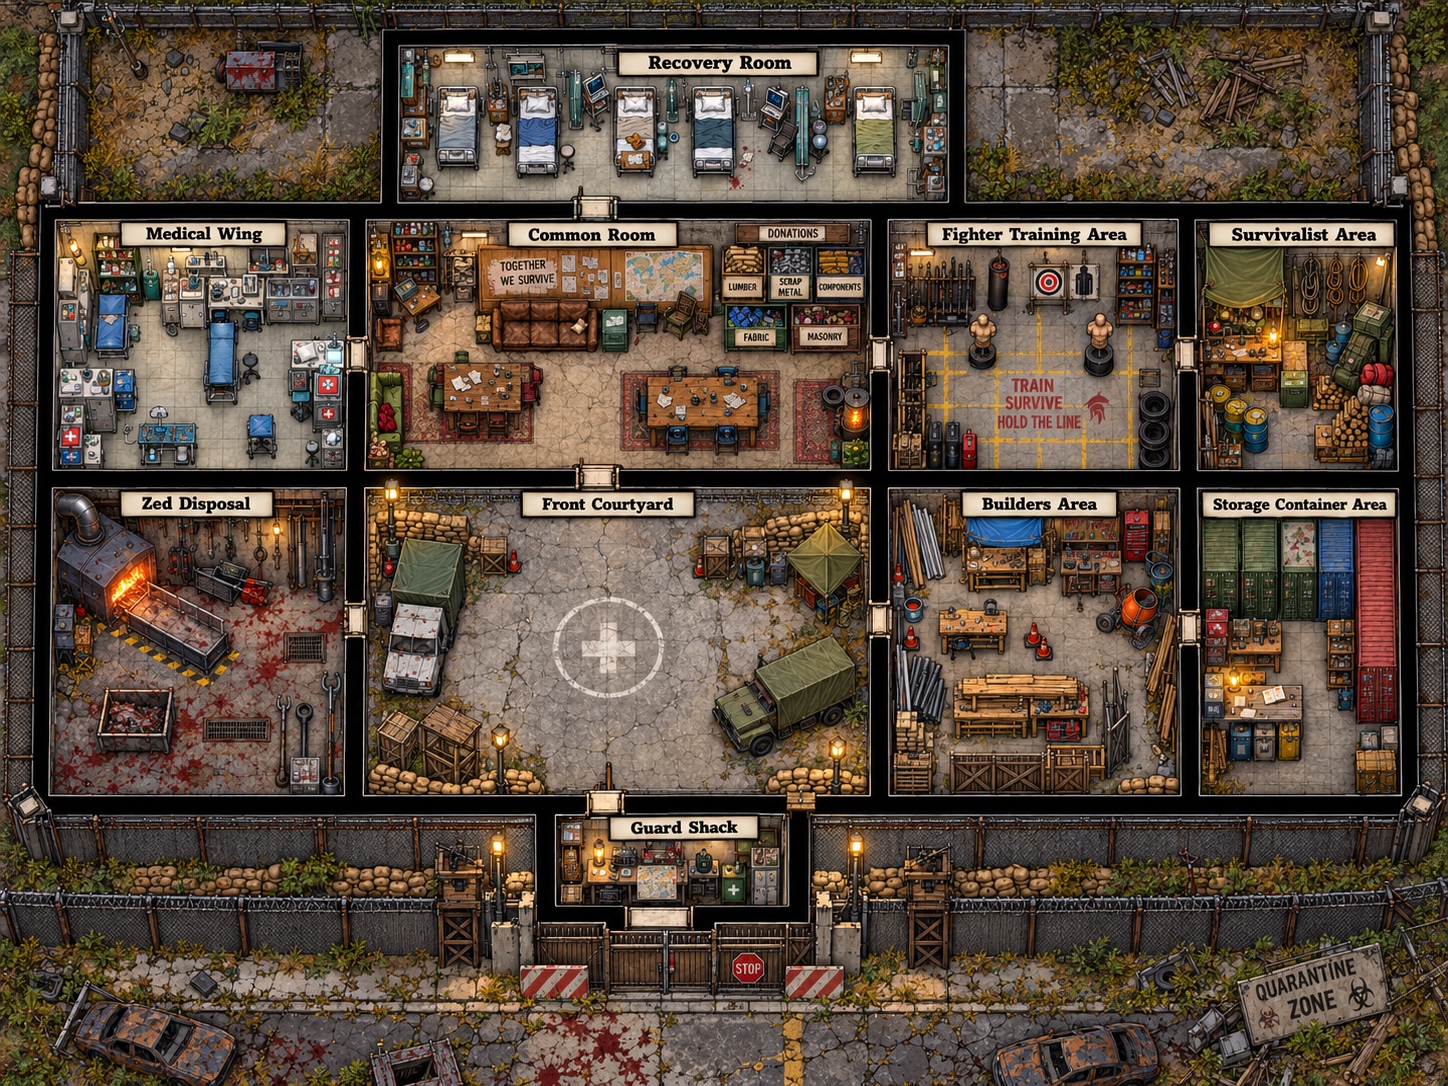
The Safe Zone is the central survivor settlement and your main hub. It is classified as Threat Level 0. Ambient Zed encounters do not occur inside it.
Recovery Room
The Recovery Room is where incapacitated survivors are returned by the recovery team.
Common Room
The Common Room serves as a central social area and contains the Safe Zone donation system.
Medical Wing
Medic Rachel can provide bandage supplies and treatment.
Fighter Training Area
Trainer Harlan teaches weapon abilities. A Training Dummy allows safe combat practice.
Survivalist Area
June Mercer provides Repair Kits used with Mend.
Front Courtyard
A major outdoor junction inside the fortified perimeter.
Zed Disposal
Bringing corpses back from the field and disposing of them can contribute to Advancement Progress.
Builders Area
Hudson provides Scavenge training.
Storage Container Area
This area contains each survivor’s personal resource storage.
Guard Shack
The Guard Shack stands near the reinforced entrance to the Safe Zone.
6. Threat Levels
Zeadwood uses four player-facing threat categories to give survivors a general indication of local danger.
| Threat | Meaning |
|---|---|
| Threat 0 — SAFE | Safe Zone and support areas. Ambient Zed encounters do not occur here. |
| Threat 1 — NORMAL | Standard areas outside the Safe Zone. |
| Threat 2 — MODERATE | More dangerous locations. Exercise greater caution. |
| Threat 3 — HIGH | The most dangerous currently designated V1 areas. Enter prepared. |
The current area's threat level is displayed on the minimap. A higher threat rating does not necessarily mean a Zed is currently present; it represents the overall danger associated with that location.
- Residential streets
- Abandoned homes
- Commercial areas
- Farm fields
- Farm buildings
- Woods
- Trails
- Pond and cottage areas
- Remote wilderness locations
Not every dangerous situation announces itself in advance. Explore accordingly.
7. Picking Up and Carrying Items
get <item> take <item> get <item> from <container>Examples:
get flashlight get work boots from corpseInventory
invZeadwood’s inventory display includes held and worn equipment as well as carried resource totals and capacity.
The browser interface also provides an INVENTORY button on the left side. Directly beneath it, LEFT HAND and RIGHT HAND show what you currently have equipped.
8. Searching for Gear
Many outdoor and abandoned locations can be searched for useful physical items.
search hereScavenge gathers numerical building resources.
How Searching Works
A search takes approximately 30 seconds to complete. Progress messages appear in the transcript while the search is underway.
Searching makes noise and increases the chance of attracting Zeds.
Interrupting a Search
A search is interrupted if a Zed engages or pursues you, or if you move away from the location.
Interrupted searches do not deplete the area. You can return and try again later.
Search Results
A completed search may find nothing, one item, or occasionally multiple items.
Found items are placed in the room and must still be picked up normally.
get hatchetSearch Recovery Time
Once a location has been successfully searched, it normally cannot be searched again for approximately 30 minutes.
Search is available in many outdoor and abandoned locations, but generally not in Safe Zone or support areas.
9–12. Fighting Zeds, Retreating & Training
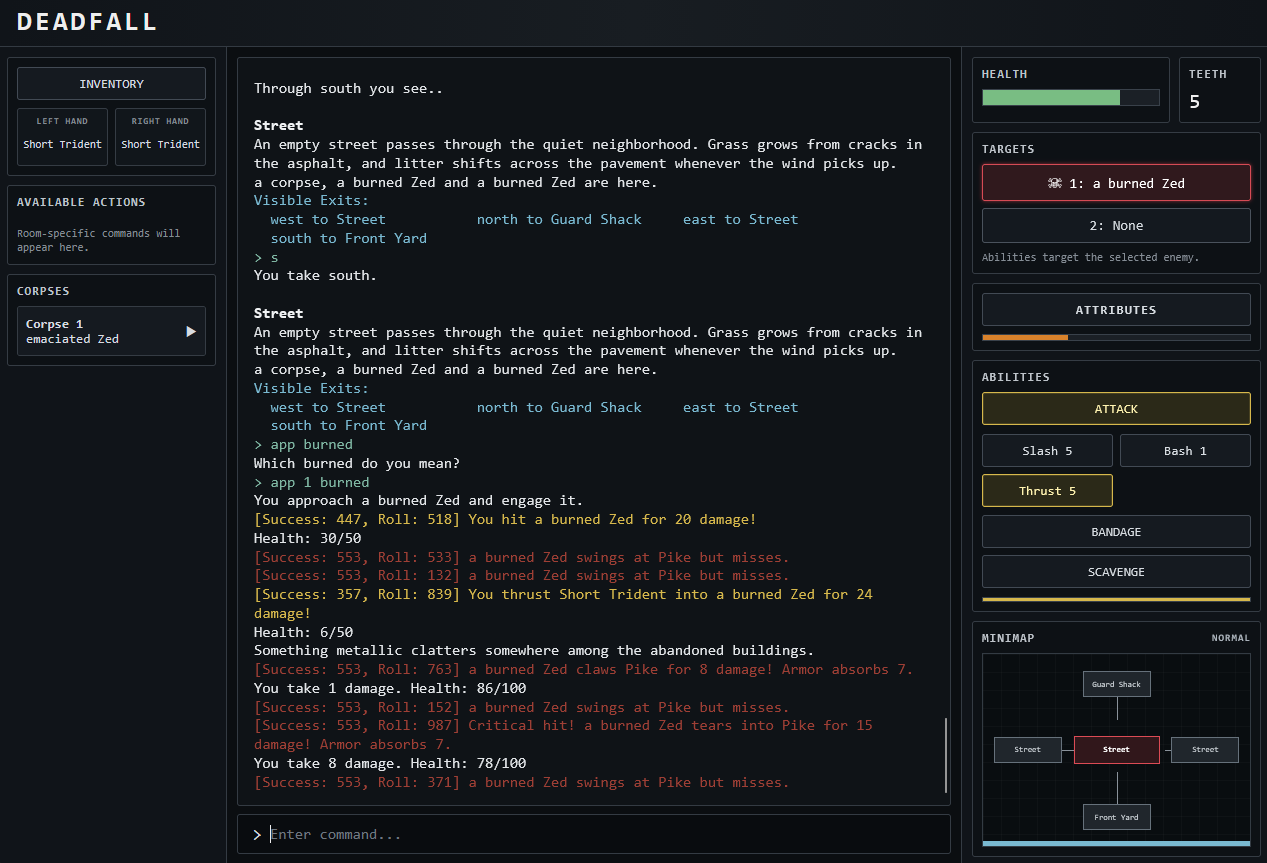
Engaging a Zed
approach <zed> app <zed>Basic Attack
attack <zed> att <zed>The standard attack can be used even if you are not holding a weapon.
Weapon Abilities
slash <zed> bash <zed> thrust <zed>Slash requires a slashing weapon, Bash a blunt weapon, and Thrust a piercing weapon. Weapon abilities check the weapon in your right hand.
Weapons With Multiple Attack Styles
Some weapons support more than one trained attack type. A weapon might support Slash and Thrust, or Bash and Thrust.
The interface highlights the trained attack buttons that your current right-hand weapon supports.
Multiple Combat Targets
When more than one Zed is engaged with you, the target buttons track the specific individual Zeds rather than relying only on their names. Select the target you want before using an interface combat ability.
Retreating
retreat ret retreat from <target>Retreat is not guaranteed to succeed. If successful, start moving away. Zeds may pursue you.
Combat Training
train slash train bash train thrustTraining costs Teeth.
Training Dummy
approach dummy attack dummy slash dummy bash dummy thrust dummy retreat from dummyThe dummy is not actually injured and does not award normal combat Advancement Progress. Its targeting is handled separately from normal Zed targets.
13. Attributes and Character Advancement
attributesThis displays Strength, Agility, Endurance, Character Level, Advancement Points, Advancement Progress, and trained ability levels. The current maximum displayed value for each core attribute is 30.
Raising Attributes
raise strength raise agility raise enduranceHow you spend Advancement Points becomes an important decision as your survivor develops.
14–15. Medical Care and Equipment Repair
Bandage
bandage me bandage <player>Bandaging is an ability check and may fail.
Learning Bandage
train bandageBandage Supplies
resupplyMedical Treatment
receive treatmentMend
train mend mend <item> restockA successful field repair can currently restore an item up to 75% durability. Mend requires Repair Kits.
16–18. Scavenging, Storage & Donations
Scavenging
train scavenge scav scavengeScavenging may produce Lumber, Scrap Metal, Components, Fabric, and Masonry. These are numerical resources rather than ordinary physical items.
Search vs. Scavenge
| Action | What it Finds |
|---|---|
| search here | Physical gear and weapons |
| scav / scavenge | Lumber, Scrap Metal, Components, Fabric, and Masonry |
Scavenge has its own cooldown of approximately 150 seconds and cannot be used while Zeds are actively pursuing or attacking you.
Then look for lumber.
Personal Resource Storage
locker deposit <amount> of <resource> withdraw <amount> of <resource>Donating to the Safe Zone
donate <amount> of <resource> donationsDonating can award limited Advancement Progress during your current donation period.
19–20. Zed Corpses, Teeth & Duplicate Objects
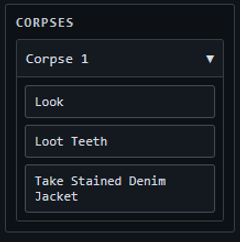
Inspecting Corpses
look corpseCollecting Teeth
loot teeth from <corpse>Looting Equipment
get baseball bat from corpseCarrying a Corpse
get corpseDisposing of Corpses
dispose corpseAutomatic Corpse Cleanup
Zed corpses left in the world are automatically cleaned up after approximately 15 minutes. You still have time to inspect them, loot them, or carry them away before this happens.
Corpses returned to the Safe Zone can still be manually disposed of for the normal disposal reward.
Handling Multiple Corpses
When several corpses are present, numeric references can be used:
look 1 corp look 2 corp get 3 corp loot teeth from 2 corpIf corp is ambiguous, Zeadwood will ask you to specify which corpse.
Browser Corpse Panel
The browser interface can display up to five corpses in the current room. Each entry identifies the former Zed, and visible loot remains listed beneath the appropriate corpse.
Corpse 1 burned Zed Corpse 2 one-eyed ZedOther Duplicate Objects
Traditional parser references can still be useful in other situations:
look first corpse look second corpse attack first zed approach second zed get work boots from second corpse22. Exploration and Discovery
Zeadwood is not designed so that every room contains a button to press or a resource to collect. Some places exist because they make the world a world.
- Empty buildings
- Roads
- Trails
- Woods
- Fields
- Landmarks
- Environmental details
- Hidden locations
- Caches
- Loot areas
- Increasingly dangerous territory
- Searchable areas
- Scavenging locations
23. A Survivor’s First Trip Outside
inv attributes- Understand what equipment you are carrying.
- Check the LEFT HAND and RIGHT HAND displays.
- If you intend to use Slash, Bash, or Thrust, make sure the weapon in your right hand supports that attack.
- Know your abilities and condition.
- Check your health bar.
- Look at the minimap's threat display.
- Learn how to retreat before you need to retreat.
- Remember where the gate is.
Once outside: use look whenever you enter somewhere unfamiliar. Pay attention to exits and watch the local threat level.
Use search here in promising abandoned areas if you are prepared to spend time making noise. Use Scavenge when you need building resources.
Do not assume every Zed is equally dangerous. Do not assume every strange sound means a Zed.
The Recovery Team has enough work already.
24. Quick Command Reference
| Command | Purpose |
|---|---|
| n / s / e / w | Move in a cardinal direction |
| look | Look at your current location |
| look <target> | Examine something |
| inv | Show inventory, equipment, and resources |
| get / take <item> | Pick up an item |
| search here | Search an eligible location for physical gear and weapons |
| approach / app <zed> | Engage a Zed |
| attack / att <zed> | Basic attack |
| slash / bash / thrust <zed> | Weapon abilities |
| retreat / ret | Attempt to disengage |
| attributes | Display character and advancement information |
| teeth | Show current Teeth balance |
| bandage me / bandage <player> | Medical ability |
| train mend / mend <item> / restock | Equipment repair |
| train scavenge / scav / scavenge | Gather numerical resources |
| locker | View resource storage |
| donate <amount> of <resource> | Contribute resources |
| look 1 corp / look 2 corp | Identify one of several corpses |
| loot teeth from 2 corp | Harvest Teeth from a specific corpse |
| get corpse / get 2 corp | Carry a Zed corpse |
| dispose corpse | Dispose of a corpse |
| grin | Social emote |
Final Advice
You do not need to memorize this manual. Zeadwood is designed to be learned by playing.
When you are unsure what is around you:
lookWhen you want to know what you are carrying:
invWhen an abandoned location looks worth investigating:
search hereWhen you need raw materials:
scavengeWhen you are unsure whether you are prepared for a fight:
There will always be another building to explore, another trail to follow, another resource to collect, and another Zed waiting somewhere beyond the walls.
Learn the Safe Zone.
Learn your abilities.
Watch your health.
Watch the threat level.
Know when to retreat.
Loot corpses before they disappear.
Help the people around you when you can.
pay attention to the road ahead.
Welcome to Zeadwood.
Back to top ↑
21. Social Interaction
Zeadwood is a multiplayer world. Players can communicate and interact through the game itself.
grinProduces:
Pike grins.Zeadwood’s social systems are intended to support the world rather than replace outside voice chat.